Showing posts with label 3 part cards. Show all posts

Sunday, 6 September 2015

Make Your Own Montessori 3 Part Cards - UPDATE

Update!

I know I have mentioned this before but I just wanted to give you a quick update. When I launched this a lot of people had problems logging into the course - unfortunately this was down to the course software and I couldn't do anything about it, which made me as mad as anything. Aghhhh.

Anyway, I've finally had time to set it up a bit differently so it's easier to sign up for! Which means you now just need to pop your name and email addy in the box and you will be whizzed off to start the course! Full disclosure, you will get my totally awesome weekly playbook too - I know, more free stuff, I must be nuts! Nuts but I love you ♡

You don't need any fancy software, just an internet connection and an idea of which set of cards you want to make. Simple tip there - what is your child interested in right now? Use that as your cue, easy!

In the mini course you will learn:
  • The foundations - what you need to do before you get started
  • How to set up the template so you save yourself time next time you want to make a set
  • How to legally source high quality images
And yes, it is all free! 

Feel free to share the post with anyone you think might be interested and I have added a button in the sidebar so it's easy to find in the future.


Wednesday, 29 April 2015

New Masterclass - Make Your Own 3 Part Cards

It is election time here at the moment, which means the campaign trucks are going round all the time and driving me nuts! Even more so as I was trying to record this masterclass, the last thing I wanted was the stupid campaign trucks in the background. Took me longer than anticipated but it's finished!


I am a geek so making things like the 3 part cards used in Montessori is easy for me, but I know a lot of people just find it too daunting. That's why I put together this master class. It's broken into 3 quick lessons, I show you exactly how to plan your card set, how to source the images and then I walk you through how to set up a template so you can make as many card sets as you like.

No need for fancy software, no need for a degree in graphic design, so simple even my gran could do it!

And it's free! (for now at least).. Click the link to register for the Make Your Own Montessori 3 Part Cards Masterclass

Wednesday, 14 November 2007

One Hundred Posts Awards & downloads


A while back Meg kindly gave me a blog award, it has taken me a while to get round to compiling my own award list and so, in no particular order, here are the jojoebi pure inspiration blog awards...

The Inspiational Senpei Award goes to Lindart for all her advice and encouragment over the last few months.

The Inspired Montessori Motivator Award goes to Meg of Montessori by Hand for constantly coming up with beautiful projects and ideas.

The Graphics Inspiration award goes to print & pattern who posts a wonderful array of new graphic designs from all over the world.

The Crafty Inspiring Orange Award goes to How about orange... who not only has a great taste in colour (yep, orange is my favourite too) but she also posts great links for projects and tutorials.

The Wonderful Personal Inspiration award goes to Kathy at Mikan Days, a truely remarkable lady. A mother of 4 who is battling cancer who shows such strength by writing about her life, if I am having a bad day I think of Kathy and it puts everything back into perspective.

To celebrate 100 posts I have put up the Montessori 3 part cards that I have made, just follow the instructions....

OK, go over to my flickr you should see a set called "3 part cards" on the right-hand-side, click on it. It will open a new page, click on the 3 part cards icon again.

Click on one of the pictures, to the right there is a link in blue "different sizes" click on the link

Above the picture it should say "download the medium size" you could use this but for better quality pictures click on the "original" size and then download it. (repeat for other files)

You should have the jpg file on you computer to print out as you like.....fingers crossed.

Thursday, 8 November 2007

stomp, stomp, roar, roar

here come the dinosaurs!


Since discovering dinosaurs in the local park, BabyEbi has become a bit obsessed so I decided to make him some dino 3 part cards and of course a wallet to hold them in....(no, that isn't a kangaroo on the front, it is supposed to be a Parasaurolophus!


With the wallets I made for the art and fruit cards I found that babyEbi (and erm, myself too) would sometimes pick up the wallet upside down and then all the cards would fall out, so this time I made a flap to cover the cards and hopefully hold them in....


I made a set of cards with just the picture, a set with the picture and name, a set of name cards and a set on info cards. I used the clipart from learning page , you have to sign up to access a lot of the file but it is free and there is some great stuff on there.
Although the ribbon ties I have used on other wallets look very pretty, babyEbi can't do and undo them by himself yet, so I used a dino button and an elastic hook so he can open and close it without my help.


Right, I am not sure if this is going to work, it seems to on my computer but if someone could try it out and leave a comment to say if it works or not, that would be lovely. *NOTE* - system does work :o)

OK, go over to my flickr you should see a set called "3 part cards" on the right-hand-side, click on it, you can then click on the 3 part cards icon again or the dino cards icon.

Click on one of the pictures, to the right there is a link in blue "different sizes" click on the link

Above the picture it should say "download the medium size" you could use this but you will get a BETTER quality image if you click on the "original" size - near the top of the page and then download it. (repeat for other files)

You should have the jpg file on you computer to print out as you like.....fingers crossed.

Friday, 10 August 2007

Fruit cards and plane packs

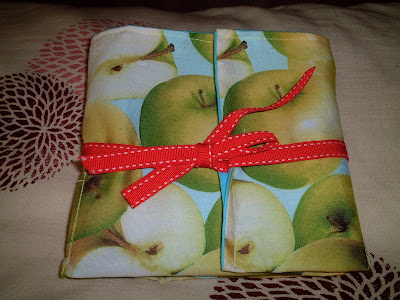
I used elleryolivia's inside activity kit idea to make a pouch for my 3 part fruit cards and a plane kit. I didn't actually have any placemats to I basically made a placemat then folded it over and sewed where I needed pockets. This was so much quicker than the art cards pouch that I made but some of the stitching is not so straight because I was watching PrisonBreak at the same time. Oops, very exciting though.
For the cards I used some of the images that Meg has on her boxnet site, a couple are my own the rest I scoured google to find. The apple material was a bit of a find and so I just had to use it for this.


This is a drawing activity set for the plane journey, I found the plane material in my scraps draw, which I actually sorted out this week.


And this was the last little bag, I had bought some pipe things that fit together which I am hoping will keep him busy when he is fed up of drawing.


Monday, 23 July 2007

working with the art cards.

I finally remembered to take a picture whiles he was working with art cards.
I have split the pack so that there are only 10 pairs in the folder at the moment.
He knows a few of the artists already, Van Gogh and Klimt, maybe because they are easiest to say. He usually matches the cards then picks up odd cards and studies them, naming various things...ball, boat, flower etc.

Saturday, 14 July 2007

Art Cards - free to download


Meg from Montessori By Hand has kindly uploaded the art cards (pictured above) that I made, to her box.net site so that anyone can download them. To access them, Click Here then scroll down the page, on the right is a blue button with "BOX view my files" click on the button and it will take you to the files. All together there are 20 cards, each featuring a painting by a famous artist, the artists name is under the picture. There are 4 cards to a sheet of A4 and you need to print the set out twice. The first set just back onto card, cut out and laminate. The second set, back onto card, cut the name section off then laminate each piece. The last bit, is a bit of a fiddle but the look great when they have finished. If you want to make a pouch to keep them in, then check out this tutorial on Meg's blog.

Friday, 18 May 2007

Art cards

As BabyEbi or should that be ToddlerEbi? is needing new things to do I actually got round to laminating the art cards I had made, there are 20 pictures of famous artists pieces of work. At the moment he uses just 10 at a time and matches the pictures, he seems to have a preference for Klimt and Dali. Meg at Montessori by Hand inspired me to dust off the sewing machine and make a pouch to keep the cards in. I used some silk that I had from Cambodia, all turned out OK except next time I will put card inside to make it stiffer.


Pin It button on image hover