Showing posts with label tutorial. Show all posts

Saturday, 5 November 2016

Jelly Eyes Tutorial - perfect to jazz up boring party food

Jelly Eyes Tutorial


I decided this year that I wasn't going to do eyeballs and severed fingers for the party but... I ended up with eyes and fingers again, how does this happen? This year though I changed my fingers and eyes, no sausages and eggs this year.

First up are the stickable yes, these turned out way better than I hope and the brilliant thing is that they just stick to things, no extra 'glue' required.

They are also quick to make, so if you are short of time and end up buying your party food you can son jazz it up with a few sticky eyes.

What you need:

I did two colours of eyes, so this is for two colours but you'll catch the drift, it's hardly brain surgery!

  • Silicon tray or greaseproof paper
  • 3 small bowls
  • Gelatine powder
  • Food colours, black for the pupil then I used red and green for the iris
  • 3 small bowls
  • Warm water
  • 3 spoons for mixing
  • Pipet


Tip some of the gelatine powder into a bowl


Add a couple of drops of black food colour


Then add the water, I didn't measure it, you want it to be quite thick, it should start to set pretty quickly, so only mix up one jelly colour at a time.


Use the spoon and make drops of jelly on the greaseproof paper, remember to keep them spaced out.


The jelly should start to set pretty quickly, in a minute or two. Once it has set you can mix up the next colour. Basically do the same as before.


This time use the pipet to deposit the jelly around the black dots. Now I did try using a spoon at first but I couldn't control where the jelly went and it was all pretty disastrous! Pipets rule! Again, you need to work fairly quickly because the jelly will start to set. There is no need to move it to the fridge to set. I was working at rom temperature and it was fine.


Once you have done one colour you can do the second. Leave to set completely, once the washing up is done they should be well set. Then you can simply peel off the silicon/greaseproof paper and stick them on whatever you like!

I actually used most of them in the Eyeful Trifle. They stick brilliant to the inside of the glass bowl so I just added the layers for the jelly and had little eyes looking out!


The roll cake got eyeballed before being chopped up for the trifle base *evil laugh*


If you make some let me know, tag me over in Moms That Rock or on Instagram, I'd love to see what you did with yours!


Tuesday, 4 October 2016

Mystery Solved...

How to make fillable PDF 


You know how sometimes you get a PDF that you can fill in online, you don't need to print it out? Well I make these all the time for my clients work and I often get asked how, it really isn't that hard. I used to use PDFescape but I recently discovered another way to do it, which is even easier! Seriously, your great-granny could do it!

Here's a techie byte showing you how, don't forget to give me thumbs up and subscribe to the channel if you want to get the latest techie bytes...


Tuesday, 16 December 2014

Easy Wreath Idea

When we got the decorations out I decided that out old wreath was looking rather shabby, time to make a new one! I managed to find the wooden wreath base at Yuzawaya then I had planned to pick up some more decorations but then I spotted a couple of meters of tinsel that I hadn't used when decorating the house.

So... four meters of tinsel wrapped around the wreath base, 10 minutes and taa-daa....

This would be a fun craft to do with the kids too.

What you need:

  • A pre-made wreath or ring of some kind. I had a woven branch wreath.
  • 4m or so of tinsel
  • Something to make a hook with if your wreath doesn't have one.
If you are doing it with kids, it'll be easier if you start it off for them. Tie the end, then just wrap around the wreath middle, keep it tight so that the branch wreath can't be seen through. We could have got away with 3 m of tinsel but 4 made it super fluffy.

Very basic and simple but it looks lovely!


And a quick update - this post was written in 2014, we are still using the same wreath, it'll be on the door in 2026!

Tuesday, 28 October 2014

Delicious Brains...


I made some lovely delicious brain for the party, and wanted to share how to do it!
This is what the finished brain looked like...nom, nom, tasty stuff!


What you need:
  • Pack of Kanten - I don't know what this is in English, you often get it in fruit salads, it's got a jelly/jello type of texture and sweet (see picture below)
  • Strawberry jam
  • red and black food colour
  • milk 50ml
  • sugar (optional)
  • brain mold available from amazon.com and amazon.co.jp
  • small saucepan
  • whisk


In a small saucepan, whisk together one sachet of kanten and 450ml water - I used less water than recommended because I wanted to set firmly. Continue heating and whisking for 2 minutes.

Add in the milk then the red food colour until it's a nice pale pink then a tiny bit of black to give it a nice grey hue. Stir in a dessert spoon of strawberry jam. Stir well until the jam has melted. You might want to add sugar or other flavouring now, mine wasn't very sweet. 

Pour into the mold then pop into the fridge for a couple of hours until it has set.


Once it looks like it has set well, turn the mold over and squeeze out - makes a suitably revolting sound when you do it!

Serve as is, or if you want to use in a bento, quarter the brain and serve with a side of fresh flesh ahem, strawberry jam! This is how I served the brains in the bento boxes at the party (see here)

Using 1 sachet will make you 8 brains, so let the first lot set then when you are ready to make the second set you can just heat up the mixture again, it will melt then pour it into the mold as before.

If you enjoyed this post please pin it and share it! Cheers.


Wednesday, 4 June 2014

How To Remover Glitter Nail Polish Easily

Trying to get the varnish off is a real PITA! I love doing my nails, it is a bit of a Friday night self pampering routine, I know how to live the high life! Anyway, I discovered a neat trick (possibly on pinterest, I can't remember) but it works a treat, so for all you disco ball nail lovers, I bring to you… 

How to get the darn stuff off easily tutorial!

1. Take a hand with some badly chipped nails, preferably with glitter varnish…


2. Next rip up some cotton wool into smallish chances, big enough to easily cover a nail…


3. Soak the cotton wool in nail varnish remover, then place on a nail, push down to make sure there is good contact….


4. Hum to yourself for 30 seconds or so, then… wipe and taa-daaa….


I have tried the nail varnish removal wipes too, some work better than others, so if you are using wipes and it doesn't work, try a different brand next time.

5. Wash hands well, clean nails, shape and then apply new spangly disco colour

And…repeat!


Saturday, 14 December 2013

Make A Christmas Tree - tutorial

One of Eric's challenges was to make a tree to add to our genkan forest. This one involved sewing, Ebi-kun is getting quite handy with the needle and thread these days…


Here is a quick tutorial…

Start with two identical triangles of felt, outs were 10cm x 12cm


Next, sew on lots of sequins, you could use buttons instead or French knots if you are all out of sequins and buttons! We only sewed them to one side but you could do both.


Taa-daa…


Place the two triangles together and stitch all around the edge, start from the bottom and make sure you leave a space to stuff it.


Add a bit of stuffing to the tree then poke a lolly pop stick in the hole, you could use a short pencil instead. Stitch up the gap.


This step was a bit tricky, we used a PET bottle lid as the base and filled it with glue, you need to hold the tree in place as you fill with glue. An extra hand is helpful here!


Once it is full dry it is done…


The tree to the right is a polystyrene cone, covered with felt and the sequins are held in place with sewing pins. A great fine motor skills activity for younger kids who can't yet do the sewing.

Tuesday, 26 November 2013

Mary Rose Cake Tutorial

Last Saturday was a national holiday, so our American friend hosted a Thanksgiving party. I offered to do the cakes. For the adults I made the very indulgent Bailey's Salted Chocolate Pie of course we didn't want the kids digging into that, so for them, I made the Mary Rose.

We had a round sponge cake that my husband had bought home from work (his company makes cake mixing machines and he often comes home with cake on testing days!) plus a couple of Castella cakes. You could easily use this to make a pirate ship for a pirate party. It was easy to put together…

Start with a round cake and 2 blocks of sponge and a jar of jam to use as glue…


Place one of the blocks on top of the circular cake then cut it so it is as wide as the block of cake…


Take one of the off cuts and place it at the front - and after repeat for the front with the other piece…


Cut it again so the back is the same width too…now do the front end…


Now to build it up, one block will go on the back. The front cut 1/3 from the end. Use some jam to stick everything together, adding some jam to the bottom of the ship will also stop it from sliding around. Once all the sponge is cut, simply build it up…


It should look something like this…


Then all you need to do is cover it with your preferred frosting, this could have done with a bit more smoothing over but I was short of time. The sails were simple, cut some printer paper and thread them onto bamboo sticks, I used a bit of masking tape to hold them in place.


Of course, if you were going for the whole pirate theme you would want to add some mini figures and the such like, my distraction technique worked, the kids were happily distracted by ship cake and the adults got to over indulge! Win-Win!

Wednesday, 20 November 2013

How to make a leaf lamp

We collected lots of treasure at the park which was just asking for some arty crafty making.


We decided to make a leave lamp. 
What you need:
A glass jar
Tea light candle
Parchment paper long enough to wrap around the hat with a bit of overlap x2
Glue
Leaves
Stapler

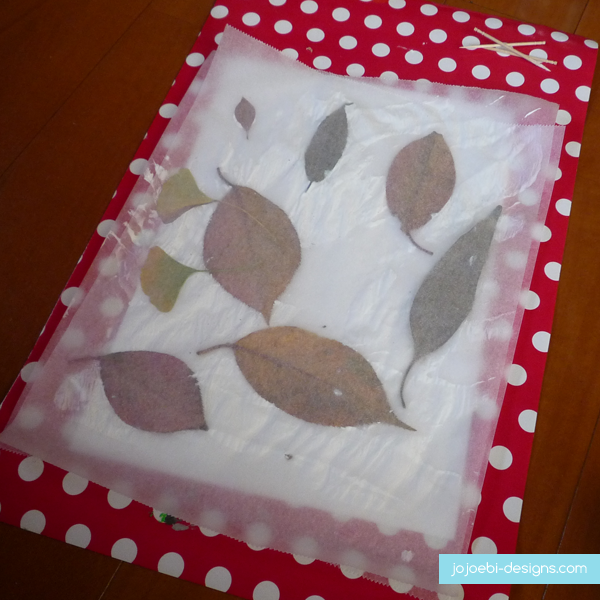
Lay the first piece of parchment on the mat, spread with glue and stick the leaves in place.


Place the second piece of parchment over the top and make a leaf sandwich.


Make sure there is no stray glue that will stick to your book. Then put a book or something heavy on top and leave it to dry.


When it is dry, wrap the parchment paper around the jar and staple the ends in place. Pop the tea light in the jar and light it then place the paper over the jar.*


*don't leave the candle unattended and be sure that the jar is deep enough so there is no naked flame able to reach the paper.

Loved this? Then grab…
The MOC Playbook: What Macgyver Would Do If He Had Kids
Organizing tips and tricks, parenting help and fun ideas delivered to you weekly - it's FREE!

Monday, 21 October 2013

How To Make A Monster Box

We decided to give our craft supplies box a makeover. It was easy and fun to do.

What you need:
A box (we used a shoebox)
Kitchen paper
Paper glue 
Acrylic paint
White glue
Cardboard egg carton
Paintbrushes, water, cloth for spills.

Start by covering your box with a layer or two of paper towels, use the paper glue to stick the towels to the box. It may need a little time to dry.


Next, paint the white paper towels the base colour of the monster that you are going to make. We used a slime green colour.


While the painter is drying, cut out three parts from the egg carton to make the eyes. Use another section of the egg carton to make a nose. When the paint is dry, use the white glue to stick the egg cartons to the box.


Now tear some strips of kitchen paper and glue them to the base of the eyes and some more around the nose. You can also add a mouth if you like. Then make three eyebrows to go above the eyes, use the paper glue to stick these in place. Allowed to dry.


Here comes the fun part, first paint each eyeball white. Then add the iris and the pupil, add a tiny dot of white as reflection. Next, paint on the blood vessels start at the top and work down to the base of the eye, allow some red paint to dribble around the base of the eye.
As we used to slime green as the base colour for the monster, we mixed up some dark green to add definition. Have fun painting your monsters face. Allowed to dry.


We didn't have much time, so we only decorated the top of the box, turned on its side it's quite a scary monster. This technique using kitchen paper is a lot of fun and can be used for many different projects, such as the spell book that we made last year.


Friday, 4 October 2013

A quick house building tutorial...

My best mate has moved house this summer and I knew she would have her little boy under foot since they couldn't get him into nursery immediately and like me, she works from home. I decided to send them a pack of goodies to help occupy him as she dealt with setting up the new house and trying to get as much work in as possible.
This was one for the things we included, it is made out of stiff card, a simple house shape with one piece with a slot at the top and the other with a slot at the bottom so they just slot together. I drew on a few things to get him going but included crayons and stickers so he could finish decorating the house himself. 


I even found him some little people to play in the house, left over from the shop. If you have ever looked on Etsy and been shocked at the price of these hand painted people, let me tell you, whatever they are charging, they are probably making 7p an hour from it. I made a whole pile of these - one of my many 'genius' ideas! Loved doing it but when it came to pricing, it was ridiculous considering the amount of time it takes to do them.

Back to the point of the post - the house was super easy to make and of course packs flat, it would be easy to add in a travel bag or have one made up for your mommy bag for when you are having lunch out with friends etc.


Loved this? Sign up for The Parent Hacks - What Macgyver would do if he had kids!


Tuesday, 17 September 2013

How to make your own erasers...

We had a full on day on Saturday, started with another trip to the doc, Ebi-kun had blisters appear on his elbows and chin, Doc confirmed it was Hand, Foot and Mouth disease he still has a sore throat but basically they can't do anything to help it.

Because we had been stuck in all week, we went over to the local prefecture pool, not to swim (not a good idea since HFM is contagious) instead we played ping-pong. Lots of fun, lots of giggling and just what we needed. Then we went to the mall for lunch and Daddy-ebi wanted to go to Uniqlo, I also picked up a new top and Ebi-kun got a bargain t-shirt and an eraser making kit. We knew there was a typhoon on the way so we stopped off at the Ice-cream farm for a medicinal ice-cream before doing the weekly shop. We got in just before the rain arrived. 

Yesterday, Ebi-kun decided to crack open his eraser making kit, I really wanted to play too but was reduced to the official photographer!

This is the set, they do doughnuts, fast foot, candy and cakes too. It was ¥525 and you get the moulds, clay and a box for cooking.


First spray the mould with water to stop the clay from sticking.


For some of the sushi parts you have to mix the colours yourself, this is egg so he just used the yellow provided. You need to knead the clay to soften it up so you can work with it.


Push the clay into the deeper side of the mould and squeeze the top on. When you open it up the excess will have squeezed out, just remove it with a toothpick.


Just do one piece at a time, this is the egg...


And this is the rice... For erasers with more than one colour you need to stick the parts together, dry the pieces first or they won't stick.


Using the box provided, put one piece of clay inside then cover with 1.5cm of water.


Zap in the microwave at 600w for 2 minutes, take it out tip the hot water out, refill with cool water for 3 minutes or so. (probably best if an adult does this)


Taa-daa - sushi erasers! This kept Ebi-kun busy for over an hour and we will use the moulds again with playdoh. 


*NOTE* Make she there is good ventilation when you are cooking the eraser and wash your hands well after using the clay, the chemical residue can have an effect on various surfaces if you don't.


FREEBIES

.
Pin It button on image hover