Showing posts with label language. Show all posts

Friday, 5 February 2016

Using Songs For Poetry Inspiration

Ebi-kun and I decided to dissect some song lyrics, one of his favourite songs is Beautiful Day by The Levellers (who he got to see live back in the summer).

The song isn't really about lovely sunshine and skipping through meadows with the wind in your hair... or whatever. It's actually very political so it turned out to be a very interesting lesson.

We started by going through the lyrics a few times and then picking out a few key sections. We talked about what each bit meant, was it literal or did it have a hidden meaning? Why did they use the 5th of November as the date in the song? Was it significant or did it just sound good?

It was interesting to listen to Ebi-kuns ideas and point of view about it all. 

I had to finish up to get dinner started but Ebi-kun felt inspired to write a poem, not connected to the song at all, just how he felt at the time...


Friday, 28 March 2014

SLAM, CRASH, BAM!


You know I am about making learning fun, well we had a load of fun with this crafty language lesson! We started off with a sheet with the word onomatopoeia on it, Ebi-kun had to get out the dictionary to find out the meaning and then he brainstormed more words that were onomatopoeic.


Then we hopped onto google and checked out the artwork of Roy Liechtenstein and talked about his use of colour and how that played with the word, why he used specific colours and the use of bold colour. And of course we couldn't resist a bit of the old Batman and Robin, Youtube provided us with some amusing fight scenes to watch. Ebi-kun declared that Batman was a bit rubbish, that cracked me up! 

Then we set to making out own words…

First, draw you word big and bold on coloured paper, use a thick black marker for the outline and think about how the work feels, drawing a font that matches the words. So the word pop might use bubble writing or slash would be very sharp!


Then cut out the word, including the bits inside the letters…


Now stick the word onto a piece of white card…


With the marker draw on some cracks or whatever matches the word that you are using…


Cut it out and the repeat the process with another colour, red in this case…


Ebi-kun did this one by himself…


Then the extra fun bit…take some action photos! we used a bit of card and masking tape to make a handle on the back of the word so he could hold it as I took the pictures…


Electrifying!!!


Quick reminder! The registration for Clear The Clutter closes soon, if chaos reins in your home and you want to take back control, then come and join us! Click HERE to register.

***No children were injured in the making of this blog post!

If you enjoyed this post - then grab the MOC playbook and get fabulous tips, tricks and fun ideas delivered to your inbox weekly!

Saturday, 20 April 2013

A free resource to build family connections and strengthen language skills in kids.

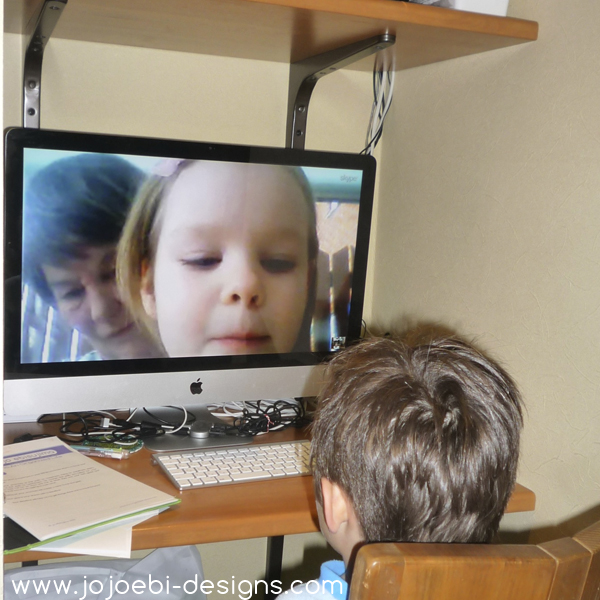
I am talking Skype or not specifically Skype but any video calls, such a mac's version or google hangouts. We Skype all the time and it has a made a HUGE difference for the relationships with Ebi-kun and family back in the UK. Google hangouts are much more fun and you can have up to 10 friends on at once BUT you need to have a high speed internet connection for it to work well.

We don't make it back to the UK that often and then when we do it is often just a day or two at most where we get to spend time with extended family. You wouldn't think that if you saw the cousins together, there is no shyness or awkward moments - they get straight in there.


When you first introduce video calls, it can often be quite awkward, no one knows what to say or how to interact. Here are a few tips which helped us to get the ball rolling as it were...

Prompts - Have an adult at each end with some questions to prompt the kids with, parents often know if there is some common ground that you can connect the kids with. M-chan on the picture above is a big Hello Kitty fan and we are in Japan, home of the mouthless cat so Ebi-kun was telling her some useless kitty facts. Her brother is Lego mad so the boys tend to talk about that and show off their different Lego models. 

Singing - When M-chan was younger the only interaction we got out of her were songs, she wouldn't talk but was happy to sing, so we would sing songs together or she would teach Ebi-kun 'playground alternatives' to the songs he knew.

Games - guessing games are fun, charades or similar.

Quizzes - these could be pre-prepared, each child makes up 10 questions to ask the other one.

Show & tell - or show and brag as it seems to be with the Lego boys! We have friends in the US and when we chatted to them, the boys got super excited when they discovered they all liked Ninjago.

Once they have got going, you can step back and leave them to it. 

One of the issues that arises when raising a bilingual/bicultural child is that, they don't always know the child language or child appropriate way of saying things. Purely because (in our case) most of his English is absorbed from adults. 

The other thing is the introduction to different accents. The majority of our English speaking friends here, don't have a very strong local dialect but of course, back home the dialect changes every 20 miles or so. It is great for Ebi-kun to interact with friends and family back home so that he can get used to hearing all these different accents. M-chan lives in Wigan and has the sort of accent which wouldn't be out of place on a building site! Her older brother has a very mixed up accent because they moved around a lot when he was younger, so although he sometimes struggles with what M-chan is saying, it is good for them to communicate.

Now, over to you... do use Skype or similar and do your kids? Do you have a games or activity that works really well? Please share in the comments section below.

If you enjoyed this post, why not sign up for the MOC newsletter, it's free!

Wednesday, 22 August 2012

How to improve language skills and imaginative play

I had completely forgotten about this fun activity I did with Ebi-kun and R-kun until I saw the post over at Perogies & Gyoza, you can read my original post here and then see how Spinky and Domba did theirs on this post (the incident with the meat scissors made me laugh so much).


Pin It

Monday, 27 August 2007

Language Explosion

When I first started to read about Dr Montessori, BabyEbi was still a bump, I was very interested on the "language explosion" that she talked about and so I have observed BabyEbi's language skills with great interest. It is amazing, how over a couple of months he has gone from odd words to mini sentences and not just in English, Japanese too. I speak mostly English to him and DaddyEbi speaks mostly Japanese. Some people seem to thing that a toddler should not be exposed to more than one language at a time because it will confuse them, I poo-poo all that.
When I lived in Jerusalem for a year, the family next door had a little boy who was 4, twins that were 2.5 and a one year old baby. When I arrived there, the baby only had a couple of words, the twins could make short sentences in Hebrew and English but would sometimes mix a sentence with the 2 languages and the eldest spoke English, Hebrew and understood French but didn't speak much. By the time I left the twins had figured out which language was which and would correct the baby when she made mistakes, they had also picked up some French, the eldest was speaking French pretty well and all four of them understood Yemeni to an extent (the mom would shout at them in Yemeni when she was angry at them!). Watching the twins play was fascinating, one would ask a question in Hebrew, the other would answer in English and they would just switch back and forth.
I have friends here in Japan with kids, it is interesting to see how they know which language to use with which person, one friend has a 4 year old daughter, she understands that she needs to speak Japanese to her daddy but she can use Japanese or English with her Mommy, she knows that she needs to use simple Japanese with me or better still English, she needs to use Japanese with her Baa-chan and Jii-chan but English with granma and grandad. I don't think anyone has sat down and explained all this to her, she figured it out herself, the same way she figured out that some words are one language and others are a different one.
BabyEbi is at the point where he is making short sentences like "look, bird up there" but he still mixes the two so he will say things like "pretty cho-cho" (pretty butterfly) or "kawaii yellow duck" (cute yellow duck) he also sticks "neh" on the end of everything no matter which language, neh is very Japanese, it is like a confirmation marker after you have stated something, I suppose like "isn't it". It's hot isn't it? or Atsuii neh?
I don't want to force English on him, he is living in Japan but on the other hand, it is important that he speaks and understands English so that he can communicate with the English side of the family, I also feel that English is an important language, people pay a small fortune to learn the language here, so I feel it is more my duty to encourage his Engliah skills.

Friday, 10 August 2007

Fruit cards and plane packs

I used elleryolivia's inside activity kit idea to make a pouch for my 3 part fruit cards and a plane kit. I didn't actually have any placemats to I basically made a placemat then folded it over and sewed where I needed pockets. This was so much quicker than the art cards pouch that I made but some of the stitching is not so straight because I was watching PrisonBreak at the same time. Oops, very exciting though.
For the cards I used some of the images that Meg has on her boxnet site, a couple are my own the rest I scoured google to find. The apple material was a bit of a find and so I just had to use it for this.


This is a drawing activity set for the plane journey, I found the plane material in my scraps draw, which I actually sorted out this week.


And this was the last little bag, I had bought some pipe things that fit together which I am hoping will keep him busy when he is fed up of drawing.


Tuesday, 7 August 2007

Everything going to plan...

Well, almost. We went to see the house again at the weekend. Thye have fitted the inside doors and are putting up wallpaper. They had found a crack in a frame in one of the upstairs rooms so they had to order a new part and so that has set them back 2 days. Our bedroom is decorated and so is the shocking pink loo! It looks like we will have the final inspection on the 21st of Aug and we are hoping to move in on the 3rd of Sept. That gives me just one week to try and get everything sorted before me and BabyEbi fly back to the UK for almost a month. Poor BabyEbi won't know if he is coming or going! I am flat out this week with things to do, I need to get BabyEbi's travel pack for the plane organised - exciting things to keep him amused, I hope. Plus I have some special things to make for my best mates hen party and they all need to be done before this weekend. Then at the weekend hubby comes home from Thailand and we have removal men coming to give us quotes then Monday we are off to see a man about a bed! (for BabyEbi, we want one custom built).
So, tonight I have a hot date with the laminator, I made BabyEbi some a, b, c cards to to travel with......

I will fold them over so that the letter is on the back and I tried to find some animals he doesn't already know.

Monday, 6 August 2007

How to make the sound pouches

Firstly, I have to say thank you to everyone who has left lovely messages and sent me emails, and all the inspiring minatures ideas. I apologise if I haven't got round to replying personally yet. It is all a bit hectic here at the moment, hubby left for Thailand at 5am this morning and I have secret items to make for my best mates hen night, which I have to finish this week before we start packing for the house move.

I apologise again for the pictures, I just used a piece of origami paper and drew on the stitching but hopefully you will get the idea.


You will need....

2m of felt
26 buttons
3mm thick elastic
coloured thread
scraps of felt for decoration

cut each pouch out, 19cm x 33cm, measure 12cm from the bottom and fold.


Using a pretty coloured thred, sew up the right side


Don't finish off the thread, turn the pouch over and cut a nice edge for the flap (I did mine all freehand)


Sew along the edge of the flap


turn it over again and sew down the lefthand side.


sew on a cute button


Cut a piece of elastic long enough to make a hoop to fit over the button, sew the ends onto the flap of the pouch. I used elastic because it is easier for BabyEbi to open by himself.


Use some felt scraps to make a decoration - which covers up the elastic end, so just the elastic hoop can be seen.


If you use a Mac you can download the Montessori font here. I printed out the letters then traced round them onto iron on felt, then ironed them onto the pouches, I also pressed the flap so that it folded down better. I did the letters in two batches rather than one at a time. I found that I could do 2 pouches a night, most nights and sometimes managed to do one during the day if BabyEbi was engrossed in his work/play.


It did take quite some time to do the whole lot but as I was making them I had them in a box in the living room, BabyEbi was wanting to look at them all the time and not just one pouch, we had to go through all the ones I had made. This was a great motivator for me, seeing how much interest he has in them and then how he is interested in the objects inside. He also tries to trace the letter on the front, like you would do with the sandpaper letters.


I had mentioned about doing a miniatures swap but I had completely forgotten that we are moving house in the next few weeks (how did that slip my mind?) so I will have to put that on hold until after the move, hmm but then I go back to the UK until Oct 9th. If people are still interested in doing that and can hang on a while, I will organise it at a later date, I think my husband will kill me if I take on something else just now!


That is going to be it for major projects for now, I might have a couple mini's, just to keep me busy hahahaa.

Thank you all again, if you have any questions, leave me a comment.

Interested in more Montessori posts, I have a free course and resources over on my website, click to be magickally whizzed over to jojoebi.com

Friday, 3 August 2007

Phonic Sound Pouches

I have finally finished the pouches. Like everything I ummed and aghhed before deciding which route to take. I decided that I would hand sew them, since getting the machine out is too much hassle and we do have such a love/hate relationship, I thought sewing 26 bags might be pushing it! So, I bought 2m of white felt, a couple packs of variety buttons and the rest of the stuff is out of my crafting supplies. Each envelope is 300mm x190mm, that is about where the continuity ends. Initially I thought I would use a button to repressed each letter apple for a, bee for b etc. but I soon came to my senses and dropped that idea. I sewed each pouch, one at a time and picked the thread/button/decoration depending on my whim at the time. I admit some are a little wonky due to a wee bit too much wine! The letters are iron on felt done in the same Montessori felt as the sandpaper letters.
It took me about 4 weeks to get them all done but I quite enjoyed them, I haven't done any hand sewing for ages.
I have put up a couple of pics on here but you can se the whole lot and what is inside on Flickr here.
I need some inspiration for letters n, i, q, u, v, y and z. If anyone has any ideas please let me know.
I got some of the little objects from swaps set up by Meg on Montessori By Hand or from friends and family plus a box that I bought 2nd hand. Some are crappy plastic things that I would like to replace, if there is anyone else making these bags that is interested in doing a swap, let me know.


Sunday, 22 July 2007

metal insets

Recently BabyEbi hasn't bothered with these but then he got them out again the other day. He really likes this shape even though it is one of the harder ones to do. He calls is "cho-cho" which means butterfly in Japanese.
I was really chuffed to discover that 15cm origami paper fits just right in the holder which is great, not only does it save me time cutting the paper out, it is also cheap as chips and comes in lots of pretty colours.
Dr. Montessori analyzed the movements which are connected with writing and developed the Metal Insets for directly preparing the child for handwriting.
The Metal Insets exercises strengthen the three finger grip and coordinate the necessary wrist movements.
The exercises also advance proficiency in lightness of touch and evenness of pressure through drawing activities. The Metal Insets invite unlimited geometric design possibilities. BabyEbi isn't able to use the inner part yet but he uses the outer part quite well, especially easy shapes like the square and triangle.


Thursday, 28 June 2007

Sandpaper Letters

These have been my pet project the last couple of weeks.
Montessori developed the sandpaper letters to help children develop the muscular impression of the letter as well as to introduce the shape and sound of each letter. They are multi-sensory which is important for children still in a tactile stage of development.
Dr Montessori believed that children should learn to write before reading because it is easier. If a child is asked to write a word, say "cat" he already has a visual image of this word in his head and only needs to take apart the word, letter by letter to reproduce the word. Reading on the other hand, the child needs to clarify the sound of each letter, one by one and then put each letter together, c - a - t then ca then cat. Before he has combined all the letters together he has no idea what the word can be. Obviously as his reading skill increase he will intantly recognise some words but every time he comes acrooss a new word, he has the same problem. Although phonics is an importnat part of the language process, English is not a phonic based language and so children need to be exposed to "sight" words too. Anyway, back to the project in hand..

Firstly, it took me an age to decide how to do it. At first I couldn't find any pre-cut board the right size so I considered using laminated card instead. My 'great' plan was to print out the letters onto the right coloured card (blue for vowels, the rest pink) and then laminate them. I was then going to use glitter glue over the letters to give a textured finish. Luckily, I had the sense to make a test one before embarking on the project, just as well since the glitter fell off after 2 days. Back to square one.
Then I discovered that Tokyu Hands sell pre-cut boards 100mm x 150 mm, perfect.
After scouring web groups like the yahoo based Montessori By Hand and Montessori Makers I came up with a fab idea (well, someone elses suggestion) to use the non stick tread that you use on stairs, she explained that because the glue on the back is super strong it was a great alternative to sandpaper - which I was trying to avoid using, I thought it would be much harder job to actually use sandpaper. So, off to the home centre I went, only to discover that they only do the stair grip stuff in strips. Bummer.
So, I decided I was going to have to go the sandpaper route when I had a bit of brainwave, sticky backed felt. I remembered it being super sticky, so I dug a scrap out and stuck it to laminated card to see how it was and also to a bit of painted wood. Both were fine but then I decided I might as well go the whole hog and use the boards.

The finished letters are FAB, the felt is also raised off the board making it more distinct, I am very chuffed with myself.

To make the sandpaper letters....

1: Buy all the bits you need: 26 boards, pink and blue paint, brushes, sticky backed felt in a light colour, small dot stickers,
stick of glue.
2: Paint the boards (I noticed that a lot of commercial boards put y on a blue board)
3: Print out the letters. I downloaded the Montessori font, for free here. I like this font because it is kind of between standard letters and cursive. Set up your document so that the page is the same size as the board you will be using. You need to make sure
there is enough space either side of the letter for the child to be able to hold the board firmly. You need to flip the text
over so that it is backwards on your screen. Most of the letters I did at a height of 200 but some odd letters, f and j were
too long so I had to make them smaller. I recommend printing out just one first to check it is OK.
4: Print out the letters, cut round them roughly.
5: Use the glue and stick the letters to the back of the sticky felt paper backing, if you have got it right, once the letter is cut
out it should be the right way.
6: Cut out the letters.
7: Stick to the painted boards (once they are dry).
8: Add a small green dot where you start to write the letter and a small red dot at the point where you finish writing the
letter.
9: I added a small yellow dot to the bottom left-hand corner of each board so that the child knows which way up the letter
should be.
10: Find a suitable box or basket to store the letters in.

Wednesday, 27 June 2007

mini

Look what I found! Some cute, cute mini work tools.
I really have to dig the sewing machine out to make the sound pouches. I am up to my eyes in sandpaper letters at the moment, I have managed to do half of them so far, and they are looking GOOD. I will do a write up on how I made them once they are finished.
The in-laws are coming the weekend after next so I really need to have a major clean up. pert of me is thinking, why do any this week? Just have a major muck out next week, the other half thinks I should start now since MIL is a bit of a neat freak!
I went to the ¥100 yen shop today and got some bits and pieces to make some more activities for BabyEbi, I have some good stuff lined up, but more about that once I have taken the photos.

Monday, 21 May 2007

"eh, eh, eh"

BabyEbi surprised us yesterday, we went to buy a bike and as we pulled up to the bike shop he started shouting "eh, eh, eh". We didn't know what he was shouting at until we saw what he was pointing at (the sign below) when I write his name for him I spell it out phonetically, he must have been taking it all in :o)

FREEBIES

.
Pin It button on image hover